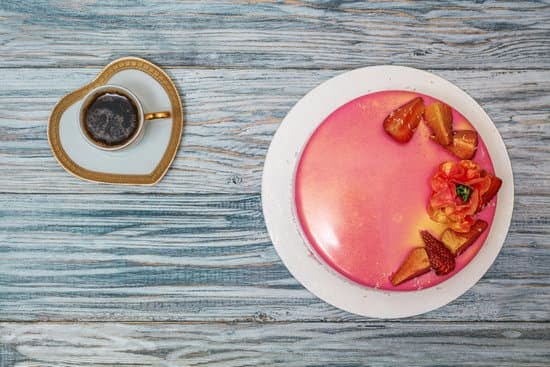
Chocolate mirror glaze has quickly become a favorite among bakers and cake enthusiasts as a stunning cake decoration. Its glossy, mirror-like appearance adds a touch of elegance and sophistication to any sweet creation. In this article, we will delve into the growing trend of chocolate mirror glaze cake decoration, exploring why it has captured the hearts and taste buds of so many.
From its unique characteristics to step-by-step guides on how to make it at home, we will cover everything you need to know about this eye-catching technique. So, prepare to unleash your creativity and create mesmerizing cake designs with the art of chocolate mirror glaze.
Understanding the Basics
Chocolate mirror glaze is a popular cake decoration technique that has been taking the baking world by storm. This glossy, mirror-like finish adds a touch of elegance and sophistication to any cake, making it the perfect choice for special occasions and showstopping desserts. But what exactly is chocolate mirror glaze?
Chocolate mirror glaze, also known as chocolate glacage, is a shiny and smooth coating made from a combination of chocolate, sugar, water, and gelatin. The mixture is heated until all the ingredients are dissolved and then poured over a chilled cake to create its signature reflective surface. The glaze sets quickly once poured onto the cold cake, creating a beautiful mirror-like effect.
The key ingredients in chocolate mirror glaze include high-quality dark chocolate or cocoa powder for rich flavor, granulated sugar for sweetness, water to dissolve the sugar and create the desired consistency, and powdered gelatin to help achieve the smooth texture and glossy finish. Some recipes may also include other flavorings such as vanilla extract or liquor to enhance the taste of the glaze.
To make chocolate mirror glaze at home, you will need to follow specific techniques and measurements to ensure success. It’s important to heat the mixture gently and avoid boiling it as this can affect the final texture of the glaze. The final result should be smooth and pourable with no lumps or air bubbles. Patience is key when working with chocolate mirror glaze as it requires careful attention to detail.
Overall, understanding the basics of chocolate mirror glaze allows bakers and cake enthusiasts to appreciate its unique characteristics and experiment with different flavors and decorations. From its shiny appearance to its velvety texture, chocolate mirror glaze adds an extra touch of elegance to cakes that are sure to impress everyone who sees them.
Step-by-Step Guide
Making chocolate mirror glaze at home is a fun and rewarding process that allows you to create stunning and professional-looking cake decorations. With just a few simple ingredients and some basic techniques, you can achieve a glossy, reflective finish that will impress your friends and family. In this step-by-step guide, we will walk you through the process of making chocolate mirror glaze at home.
To start, you will need the following ingredients: 200 grams of sweetened condensed milk, 150 grams of granulated sugar, 150 grams of water, 100 grams of dark chocolate (preferably couverture), and 10 grams of gelatin sheets. You can also add flavorings like vanilla extract or liqueur to enhance the taste if desired.
First, soak the gelatin sheets in cold water for about 5 minutes until they become soft and pliable. In a saucepan, combine the sweetened condensed milk, granulated sugar, and water. Stir over low heat until the sugar has dissolved completely. Remove from heat.
Next, add the soaked gelatin sheets to the warm mixture and stir until they have completely melted. Then add in the chopped dark chocolate and continue stirring until it has fully melted, creating a smooth and glossy consistency.
Once your mixture is ready, strain it through a fine-mesh sieve or cheesecloth to remove any lumps or air bubbles. This step is crucial to achieving a flawless finish on your cake. Allow the glaze to cool slightly before pouring it over your cake to ensure it coats evenly without melting your frosting or ganache.
When pouring the glaze over your cake, start at the center and work your way outwards in a circular motion for an even coating. Make sure that all sides are covered with glaze for a uniform appearance. If you prefer different effects such as swirling or marbling patterns on your cake, you can experiment with different pouring techniques.
Finally, allow the glaze to set completely before serving or adding any additional decorations. The glaze will typically take about 1-2 hours to set at room temperature, but you can also place it in the refrigerator for a quicker result. Once set, your cake is ready to be enjoyed and admired.
Making chocolate mirror glaze at home may seem intimidating at first, but with practice and patience, you can master this technique and elevate your cake decorating skills. So go ahead and unleash your creativity in the kitchen by experimenting with different flavors, colors, and designs using chocolate mirror glaze. The possibilities are endless, and the end result will surely impress.
Choosing the Right Cake for Mirror Glazing
When it comes to mirror glazing a cake, choosing the right cake is essential to ensure that the flavors and textures complement the glossy finish. Different cake types and flavors can work well with chocolate mirror glaze, adding an extra layer of decadence and visual appeal. Here are some recommendations for selecting the perfect cake to pair with this stunning decoration:
- Chocolate Cake: It goes without saying that a chocolate mirror glaze pairs beautifully with a rich and moist chocolate cake. The deep cocoa flavors of the cake enhance the intensity of the glaze, creating a truly indulgent experience.
- Red Velvet Cake: The vibrant red color of a red velvet cake creates a striking contrast against the shiny mirror glaze. The smooth texture of red velvet complements the glossy finish, resulting in an elegant and visually stunning dessert.
- Vanilla or White Cake: While it may seem simple, a vanilla or white cake can be transformed into something extraordinary when paired with a chocolate mirror glaze. The minimalist look allows the glaze to take center stage, showcasing its glossy sheen.
- Fruit Flavored Cakes: For those looking for a refreshing twist, fruit-flavored cakes like lemon, raspberry, or strawberry can add a burst of brightness to your mirrored creation. The tartness of these flavors provides a delightful contrast to the sweetness of the glaze.
To ensure that your chosen cake works well with mirror glazing, consider its overall texture and moisture level. A moist and tender crumb is ideal for absorbing some of the glazes’ richness while remaining flavorful on its own. Additionally, make sure that the cake is properly cooled before applying the glaze so that it sets smoothly on top without melting or becoming too soft.
Remember, experimenting with different flavor combinations can lead to unique and delicious results. Consider pairing complementary flavors like mint or hazelnut with your chosen cake base to create a truly unforgettable dessert experience.
Before moving on to the next section, let’s explore some great options for cake flavors that pair well with chocolate mirror glaze:
- Dark Chocolate Raspberry Cake: A chocolate cake with layers of tangy raspberry compote adds a burst of fruity flavor to complement the rich chocolate glaze.
- Coconut Lime Cake: The tropical taste of coconut combined with bright lime zest creates a refreshing and exotic treat when paired with the glossy chocolate mirror glaze.
- Salted Caramel Banana Cake: Ripe bananas and gooey caramel provide a wonderful contrast to the intense sweetness of the mirror glaze. The addition of sea salt balances all the flavors perfectly.
Now that you have ideas for delicious cakes to pair with your chocolate mirror glaze, let’s move on to the next section and learn how to prepare your cake for this stunning decoration.
Preparing the Cake
When preparing a cake for a chocolate mirror glaze, it is important to ensure that the base is smooth and flawless. This will allow the glaze to adhere properly and create an even, glossy finish. There are several tips and techniques that can help achieve this desired base for your mirror glaze.
Leveling the Cake
Before applying the mirror glaze, it is crucial to level the cake layers to ensure an even surface. This can be done using a serrated knife or a cake leveler. Place the cake on a flat surface and carefully slice off any domed tops, creating an even and level plane. It is recommended to divide taller cakes into multiple layers, adding a layer of filling or frosting in between for added stability.
Crumb Coating
To prevent crumbs from getting mixed into the mirror glaze, it is essential to apply a crumb coat before pouring the glaze. A crumb coat is a thin layer of frosting that seals in any loose crumbs on the surface of the cake.
Use an offset spatula to spread a thin layer of frosting over the entire cake, ensuring that all areas are covered. Refrigerate the cake for about 15 minutes to allow the crumb coat to set before proceeding with the mirror glaze application.
A Smooth Base
In order to achieve a flawlessly smooth base for your mirror glaze, it can be helpful to have some additional tools on hand. A bench scraper or a straight edge can be used to smooth out any imperfections in the frosting or crumb coat before applying the glaze.
Hold the tool vertically against the side of the cake while turning it slowly on a rotating cake stand. This will help create clean lines and remove any excess frosting or filling that may interfere with achieving a perfect finish.
With these tips for preparing a smooth and flawless base, you are well on your way to creating a stunning chocolate mirror glaze cake. Taking the time to level the cake, apply a crumb coat, and use additional tools for smoothing will ensure that the glaze adheres properly and provides a beautiful surface for your decorative masterpiece.
Applying the Chocolate Mirror Glaze
Once you have prepared your cake and made your chocolate mirror glaze, it’s time to apply the glaze to achieve a mesmerizing finish. This section will guide you through various application techniques and offer expert tips on achieving different effects.
Pouring Method
One of the most common techniques for applying chocolate mirror glaze is pouring it directly over the cake. Start by placing your cake on a wire rack or elevated surface with a tray underneath to catch any excess glaze. Make sure your cake is well chilled before pouring the glaze, as this will help create a smooth and even finish.
To pour the glaze, start at the center of the cake and slowly pour it over the top, allowing it to flow down and cover the sides evenly. Use a spatula or offset spatula to help spread the glaze if needed. Be sure to cover all areas without leaving any gaps.
Spreading Method
Another technique that can be used is spreading the chocolate mirror glaze onto the cake using an offset spatula or palette knife. This method allows for more control and precision in applying the glaze. Begin by spooning some glaze onto the center of your chilled cake, then use an offset spatula or palette knife to spread it evenly across the entire surface, working from the center outward.
Swirling Method
For a more artistic and decorative effect, you can try swirling the chocolate mirror glaze on top of your cake. To achieve this effect, pour several different colors of prepared mirror glazes onto your chilled cake in random patterns or lines. Then, use a skewer or toothpick to gently swirl around these colors to create beautiful marbling effects.
Remember to work quickly when using these techniques, as chocolate mirror glaze sets quickly once applied to the chilled surface of a cake. Take care not to overwork it, as this can cause the glaze to lose its glossy finish.
Expert Tip: If you want a matte finish rather than a glossy one, you can gently tap the surface of the poured glaze with your fingertips or a spatula. This will create small air bubbles that will give your cake a velvety appearance.
By experimenting with these different application methods and techniques, you can achieve a mesmerizing finish that will impress your guests and make your cake truly stand out. Don’t be afraid to get creative and explore different design possibilities with chocolate mirror glaze.
Making it Your Own
The chocolate mirror glaze technique offers endless possibilities for creativity and personalization. Once you have mastered the basic recipe and application techniques, it’s time to let your imagination run wild and make the chocolate mirror glaze truly your own.
One way to make the mirror glaze unique is by experimenting with different flavors. While the classic chocolate flavor is always a winner, you can also try incorporating other flavors such as coffee, caramel, or even fruit purees into the glaze. This will not only enhance the taste of the cake but also add a beautiful color to the glaze.
In addition to flavors, decorative elements can take your chocolate mirror glaze cake to another level. Edible flowers are a popular choice as they add an elegant and natural touch to the cake.
You can also use sprinkles or edible glitter to create a festive look. Another option is to incorporate chocolate decorations, such as swirls, curls, or shards, which can be made by piping melted chocolate onto a silicone mat and letting it set before adding them to the glazed cake.
| Decorative Element | Description |
|---|---|
| Edible Flowers | Naturally delicate and beautiful flowers that can be added on top of the glazed cake |
| Sprinkles | Colorful and fun embellishments that can be sprinkled over the glazed cake for a festive look |
| Chocolate Decorations | Curls, swirls, or shards made from melted chocolate that can be added for texture and visual interest |
Remember, the key is to have fun and let your creativity shine through. Don’t be afraid to try new flavors and experiment with different decorative elements to create a chocolate mirror glaze cake that is truly unique and reflects your personal style.
Troubleshooting Common Mirror Glaze Challenges
When working with chocolate mirror glaze, there can be a few common challenges that may arise. However, with the right knowledge and techniques, these issues can be easily overcome. In this section, we will address some of the potential problems you may encounter and provide troubleshooting tips and solutions to help you achieve that perfect glossy finish.
One challenge that some bakers may face is a cloudy or dull finish on their mirror glaze. This could be caused by several factors, such as using low-quality chocolate or not properly heating and cooling the glaze. To avoid this issue, it is important to use high-quality chocolate with at least 60% cocoa content and make sure to heat and cool the glaze according to the recipe instructions.
Another common challenge is achieving an even coating of the mirror glaze on the cake. Uneven application can result in patches or streaks on the surface, which may not give you the desired look. One solution to this problem is to ensure that your cake is properly chilled before applying the glaze. A chilled cake will help slow down the setting process of the glaze and allow for a smoother application.
Lastly, some bakers may find that their mirror glaze does not adhere well to the cake or slides off completely. This can happen if the cake surface has any oily or greasy residues, such as from buttercream frosting.
To prevent this issue, it is crucial to properly clean and dry your cake before applying the mirror glaze. Additionally, adding a thin layer of neutral-flavored gelatin-based glaze or simple syrup on top of your cake before introducing the mirror glaze can also help improve adhesion.
| Common Issues | Troubleshooting Tips |
|---|---|
| Cloudy or dull finish | Use high-quality chocolate; heat and cool the glaze properly |
| Uneven coating | Chill the cake before applying the glaze for smoother application |
| Poor adhesion | Clean and dry the cake surface thoroughly; consider using a gelatin-based glaze or simple syrup as a base layer |
By following these troubleshooting tips, you can overcome common mirror glaze challenges and achieve that flawless, glossy finish on your cakes. Remember, practice makes perfect, so don’t be afraid to experiment and learn from your mistakes. With patience and perseverance, you’ll soon become an expert in creating mesmerizing chocolate mirror glaze cake decorations.
Inspiring Designs and Showstopping Examples
Chocolate mirror glaze cake decoration has skyrocketed in popularity among both professional bakers and cake enthusiasts. The allure of the glossy, reflective finish and the endless creative possibilities it presents have captivated the imaginations of many. In this section, we will showcase inspiring designs and showstopping examples of chocolate mirror glaze cake creations from professionals and enthusiasts alike, providing readers with a wealth of ideas and inspiration for incorporating this technique into their own cake designs.
One stunning example of a chocolate mirror glaze creation is the galaxy-themed cake. This design combines deep blues, purples, and hints of shimmering gold to create an otherworldly effect on top of a rich chocolate cake. The mirror-like finish enhances the illusion of a distant galaxy, making it truly eye-catching and mesmerizing.
Another impressive design worth mentioning is the floral-inspired chocolate mirror glaze cake. Delicate edible flowers are carefully arranged on top of a blank canvas created by a smooth white chocolate glaze. The vibrant colors of the flowers contrast beautifully against the shiny surface, creating an elegant and sophisticated look that would be perfect for weddings or other special occasions.
For those who prefer a more playful approach, consider trying a “drip” design using different colored mirror glazes. By allowing various shades to flow down the sides of the cake in an organic manner, you can achieve an abstract and visually intriguing effect. Experimenting with different color combinations adds depth and character to your creation while still maintaining the smooth mirror finish.
Regardless of which design resonates with you, these showstopping examples demonstrate just how versatile and visually striking chocolate mirror glaze can be as a cake decoration. With some creativity and practice, you too can create cakes that leave everyone in awe with their beauty.
Conclusion
In conclusion, chocolate mirror glaze cake decoration is a spectacular technique that allows bakers and cake enthusiasts to unleash their artistic side and create visually stunning desserts. The allure and popularity of this trend can be attributed to the mesmerizing glossy finish it creates, adding an extra wow factor to any cake. By understanding the basics, following a step-by-step guide, and utilizing creative variations and decorative elements, anyone can master the art of chocolate mirror glaze.
One of the key takeaways from this article is that chocolate mirror glaze is not as intimidating as it may seem. With a foolproof homemade recipe and expert tips on achieving the desired consistency and shine, anyone can successfully create this technique at home. It offers endless possibilities for customization, allowing bakers to experiment with different flavors, textures, and even decorative elements like edible flowers or chocolate decorations.
Furthermore, chocolate mirror glaze is not limited to professional bakers. The showcased stunning examples from professionals and enthusiasts alike prove that anyone can create showstopping cakes with mirror glaze. It is an opportunity for individuals to tap into their creativity and surprise guests with unique and visually striking dessert creations.
Frequently Asked Questions
Does a mirror glaze cake need to be refrigerated?
Yes, a mirror glaze cake needs to be refrigerated. Mirror glaze is a glossy and shiny coating that is typically made with ingredients like chocolate, gelatin, sugar, water, and condensed milk.
These ingredients can be sensitive to heat and can cause the mirror glaze to melt or lose its consistency if left at room temperature for too long. Therefore, it is important to refrigerate the cake after applying the mirror glaze to ensure its stability and preserve its appearance.
What is a mirror glaze made of for a cake?
A mirror glaze for a cake is typically made of a combination of ingredients such as chocolate, gelatin, sugar, water, and condensed milk. The specific ratios and preparation methods may vary depending on the recipe or desired outcome. Chocolate is a key ingredient in mirror glazes as it provides the rich color and shine that gives this coating its name.
Gelatin acts as a thickening agent to help achieve the smooth texture of the glaze while allowing it to set firmly on top of the cake. Sugar contributes sweetness while water helps dissolve and activate other ingredients. Condensed milk adds richness and creaminess to the mirror glaze.
What is the difference between glaze and mirror glaze?
The main difference between a regular glaze and a mirror glaze lies in their appearance and purpose. A regular glaze is simpler in nature, often consisting of powdered sugar mixed with liquid (such as water or citrus juice) to create a thin icing-like consistency that can be poured or drizzled over a cake or pastry.
It adds a subtle sheen but does not have the same high-gloss reflective finish as a mirror glaze.

Welcome to our cake decorating blog! My name is Destiny Flores, and I am the proud owner of a cake decorating business named Cake Karma. Our mission is to provide delicious, beautiful cakes for all occasions. We specialize in creating custom cakes that are tailored specifically to each customer’s individual needs and tastes.


